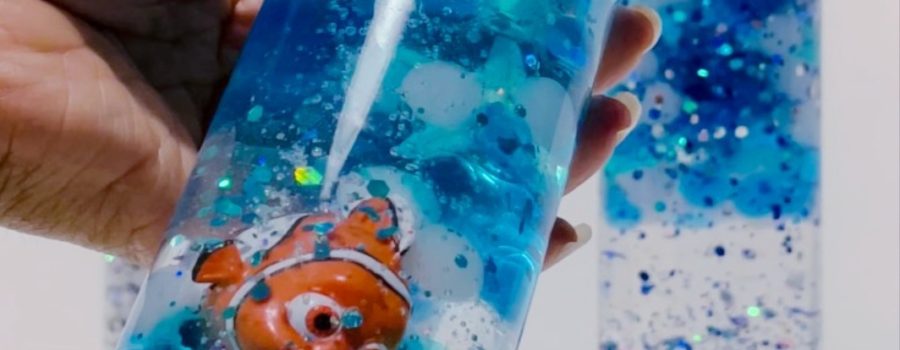
This week we’re going to be discussing sensory bottles and the many amazing uses for them both for your face to face and teletherapy sessions! When I discover something, I LOVE I can hardly wait to share my excitement with you. The idea to make sensory bottles came to me on our recent vacay to the beach. While we were there, I joked with my boys about how I would love to bottle up the beach and take it home with us. Well…if I could put the beach in a bottle, it might look a little something like these.

Do you use sensory bottles with your students?
We had so much fun making these that we will be making more very soon. When the boys were younger, we always had sensory tables, sensory bins, sensory cubes, and all kinds of sensory toys but we never bottled it up until now! I am absolutely hooked. There is SO MUCH language involved with making these. From the brainstorming of what to include in the bottle, to talking about them once they are complete, and incorporating them into game play these are loads of FUN.
Sensory bottles would be great for vocabulary, executive functioning, naming, describing, comparing, contrasting, sequencing, and MORE! Would they be a good choice for teletherapy? ABSOLUTELY! I definitely plan on incorporating these into my sessions for sure. Because they are SO EASY to make, you can create bottles for each theme you plan to work on with your students throughout the year.
What you Need to Make Sensory Bottles:
To make sensory bottles, as seen here, you will need the follow supplies.

Materials Used
- Clear bottles with tight fitting lids. Any clear bottle will work but keep in mind that the opening of the bottle will determine what can fit in the bottles. I wanted bottles with a wider opening to give me more options. The bottles above were purchased from Amazon and came in a pack of twelve. (NOTE: The links below are affiliate links. I am an Amazon Affiliate and receive a small commission if you purchase the products I recommend. These are just my recommendations, feel free to shop around for what works best for you.)
- Water beads
- Clear Glue -this can be found in the school supply section of most major stores.
- Glitter – I love things that sparkle so I have tons of glitter available to use in all colors at all times, lol! Adding sequin is also a great option to create dimension and variety.
- Tiny Pom Poms – these are optional but fun to look at.
- An assortment of small items to coincide with you theme of choice (i.e. shells, mini erasers, shoe charms, miniature animals, buttons, sequins, etc). These can be found around your house or purchased from dollar section of Target or Dollar Tree).
- Water
If you work face to face with your students and want to make sensory bottles with them, it is a great activity! If you work remotely via teletherapy, sensory bottles are a great option to incorporate in your sessions to elicit language.
Once you have your materials you will follow these simple steps to create your masterpiece.
Step by Step Instructions on How to Make Sensory Bottles:
- Open the lid on your bottles and sprinkle glitter on the bottom. The amount of glitter you add is up to you and how “sparkly” you want your bottles to be. The glitter is what makes them have a mesmerizing look once they are complete so have fun with using multiple colors of glitter. For our ocean themed bottles, we used blue, white, and silver glitter.
- Add your water beads. You will want to activate your water beads prior to adding them to your bottles. Plan ahead and have this step completed before starting with your students. It can take several hours for water beads to reach full size so letting them soak in water the night before is best. Sort the beads by color for a great face to face activity. This sorting time can be used to brainstorm with your students. It is excellent for observing spontaneous speech and talking about all the things that can be added to the bottles. The number of water beads you add is also personal preference. I wanted to ensure that there was enough room in our bottles for things to move around freely so we only added about 10-15 beads of each color. For the ocean theme, we used blue, white, and clear water beads.
- Decide what additional items you would like to add to complete the bottles. For the ocean theme, we added glitter pom poms, a couple of shells, and a plastic Nemo fish.
- Now you’re ready to add the water. The consistency that worked best for us was to fill the bottles ¾ of the way with water.
- Fill the remaining ¼ of the bottle with clear glue.
- Secure your lid tightly. If you want an added layer of security you could reinforce the seal of the bottle with a little hot glue or super glue.
- Shake your bottles gently to ensure that your water and glue mix completely.
Now you’re ready to enjoy your beautiful creations!

How to Use Your Sensory Bottles:
As a teletherapist, I’m excited by the possibilities of using sensory bottles with my students. They are beautiful to look at and are a great way to elicit language even when working remotely. For this ocean themed unit my plan is to use these bottles to tap into prior knowledge and experiences. As we are exploring all of the vocabulary associated with the ocean and the beach, allow students to see the bottles in motion.
Create a list of target words that are associated with the ocean. Display this list on your virtual whiteboards. Another option is to use a graphic organizer. In addition to identifying target vocabulary encourage your students to share their experiences with going to the beach. If your students don’t have specific experiences, plan a virtual field to the beach. Let your students view pictures and video of the beach and talk about all the things they would like to do “at the beach”.
Pairing these sensory bottles with a book or short story is a great way to incorporate literacy. Prior to reading the book/story discuss prior knowledge to create a frame of reference. This Sequencing and Story Retell unit includes a short story about a trip to the beach and is in the format of Boom Cards.
As with all of the units in this series, students will be able to answer comprehension questions, address key vocabulary words, practice predicting, use context clues, sequence the events of the story, and retell the story with our without visual cues. Use the ocean themed bottles as reinforcement for correct answers or as a bonus at the end of the activity.
Sensory bottles are very calming and soothing to look at. Use them as mini brain breaks between activities for another great option.
For your older students, use them as a timer when playing a number of different language or articulation based games. Shake the bottles up and identify one focal point to watch sink to the bottom (i.e. a fish, shell, colored bead, etc.). When the item reaches the bottom the time is up and you let the next player have a turn.
Recommend making sensory bottles to parents and caregivers as they are an excellent language-based activity. Parents are always looking for ideas to help with carryover. Suggest that they make sensory bottles with their kids that incorporate some of their kiddos favorite things.
Additional Options and Fun with Various Themes:
My boys love the Avengers and they wanted to create sensory bottles based on their favorite characters. I thought that was a great idea and here is what they came up with.

There are SO MANY fun and engaging ways that you can incorporate sensory bottles into your sessions. Be creative and allow your students to help guide the process. As always, I hope you found this post informative, and I would love to see your creations. Please do not hesitate to reach out if you have any questions. I’m happy to help!
DISCLAIMER: Please note that the content of this and all previous/future blog posts are for informational purposes only. Be sure to abide by and follow your company’s policies and procedures. The information contained within are tips that have worked well for me in my therapy/teletherapy room.


Leave a Reply
Your email is safe with us.